2180miles
  • Home
  • Adventure Blog
  • Overland
    • Meet The Jeep
    • Mods & Installs
    • Overland Gear
    • Trip Reports & Videos >
      • Allagash Winter 2019
      • Greece Adventures 2019
      • Overland Expo East 2018
      • Allagash Wilderness 2018
      • Trans-Canada Overland 2017
      • QB-5 Adventure 2017
  • Long Trail
    • Trip Summary
    • Photojournal
    • Hike Statistics
  • Appalachian Trail
    • Trip Summary
    • Photojournal
    • Gear Talk
    • Hike Statistics
    • Financial Planning
  • Bicycling America
    • Trip Summary
    • Photojournal

Recovery and Safety Upgrades

3/13/2017

0 Comments

 
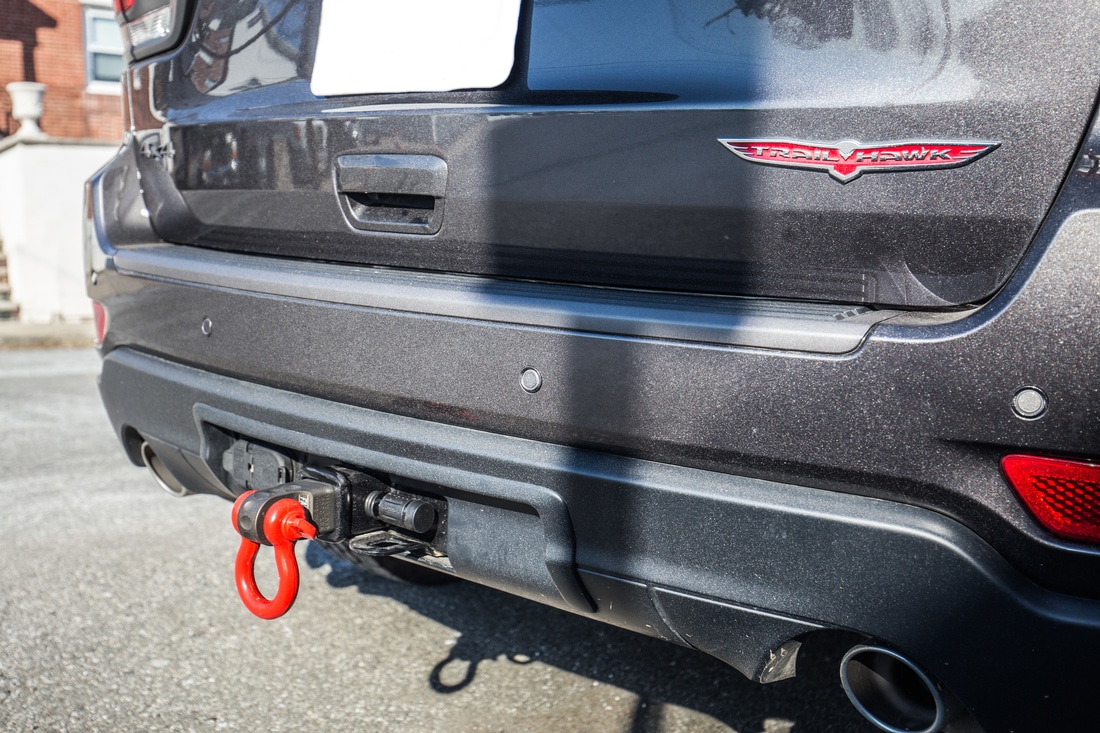
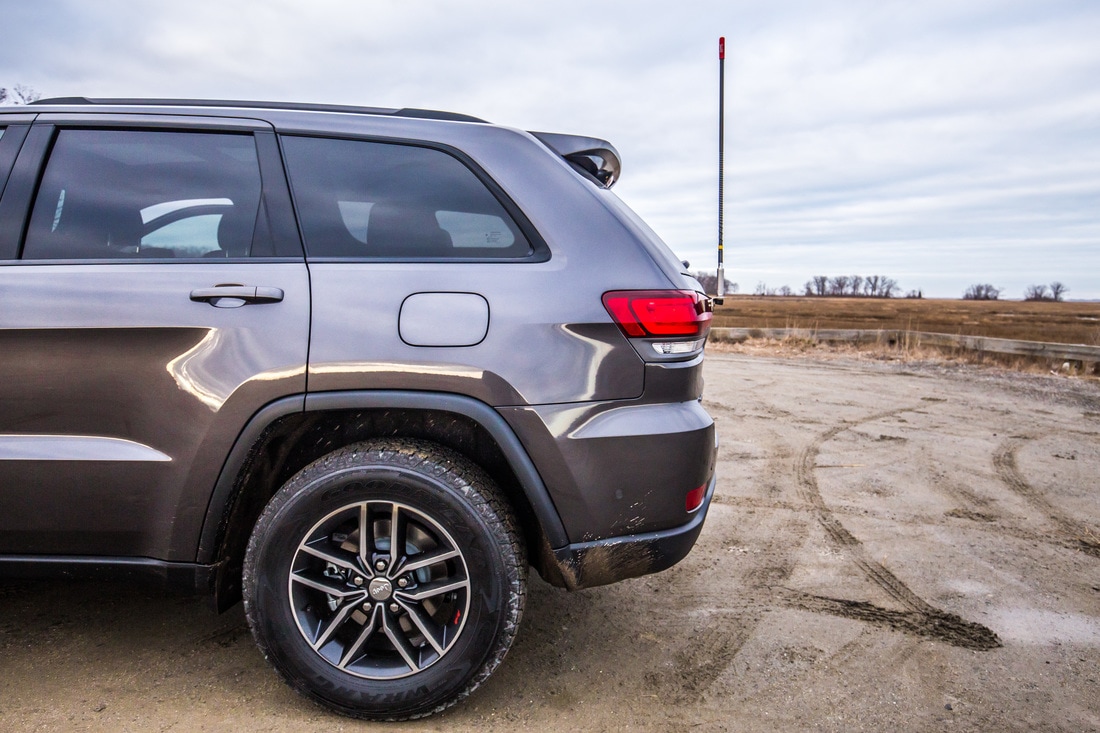
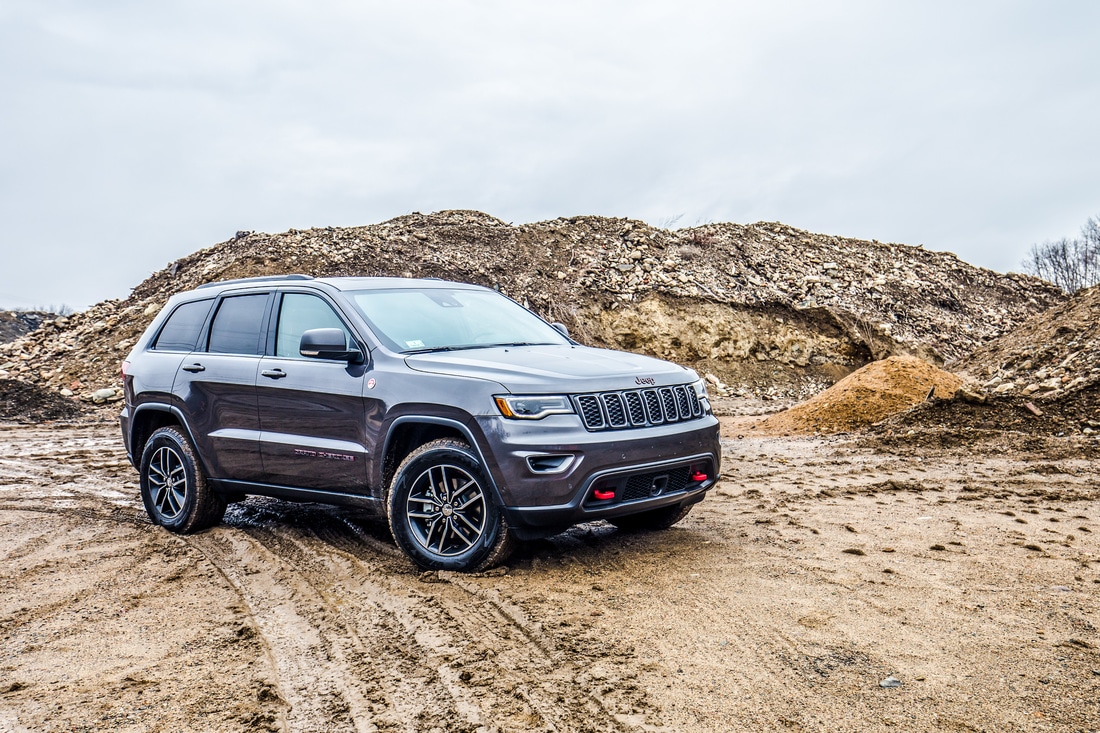
Next up... recovery points for the rear end of the rig. 

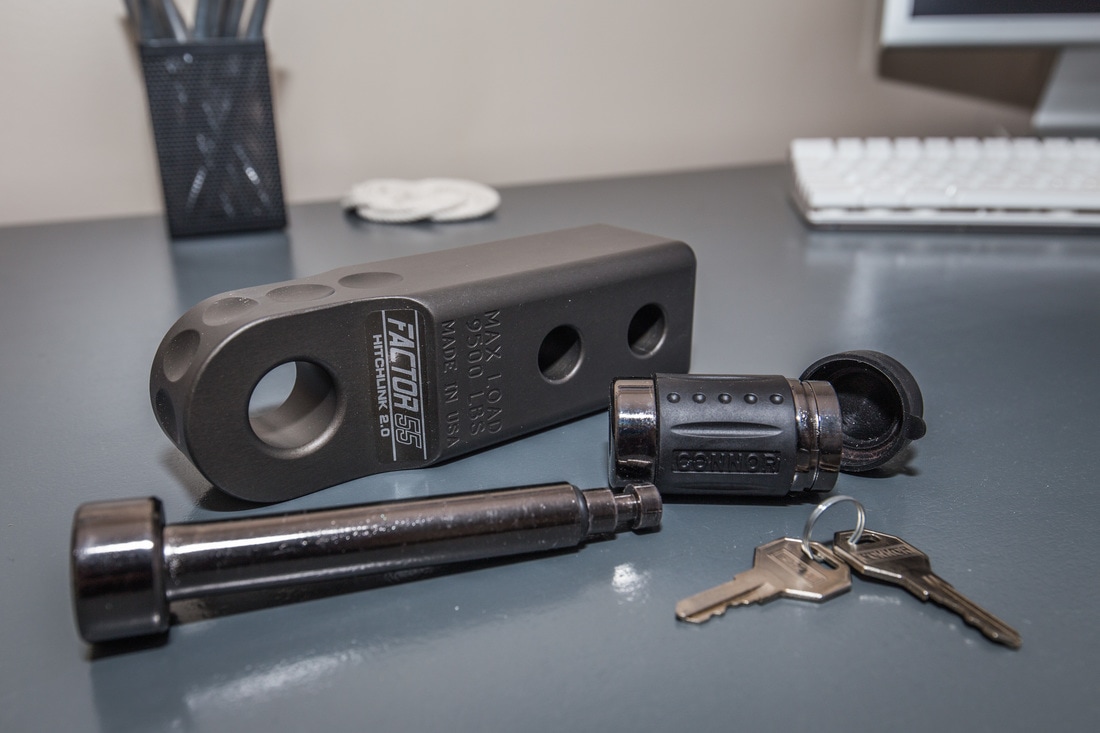
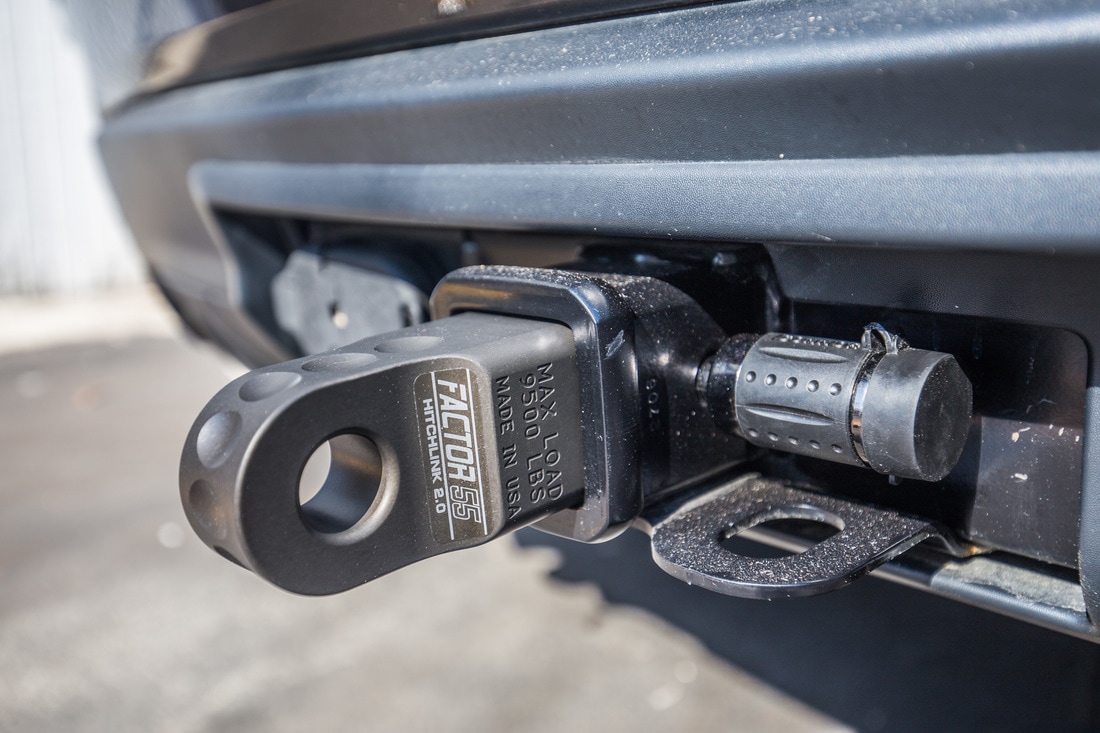
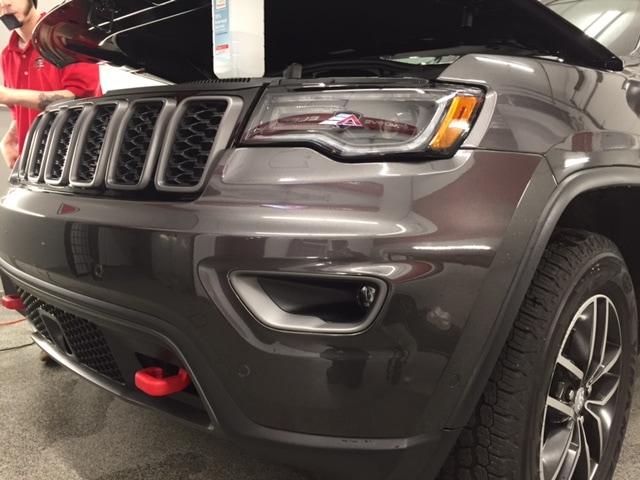
While the forward bumper of the Trailhawk is adorned with red powder coated tow hooks, a large part of the aggressive appearance of the vehicle's front end, the back has nothing readily available but a trailer hitch receiver. In the interest of being ready for things like trail recovery scenarios, I wanted to put something in the hitch to allow for being yanked backwards if ever necessary. While Harbor Freight has their classic $19 option, but obviously (wouldn't trust it with my life) it isn't really an option at all.

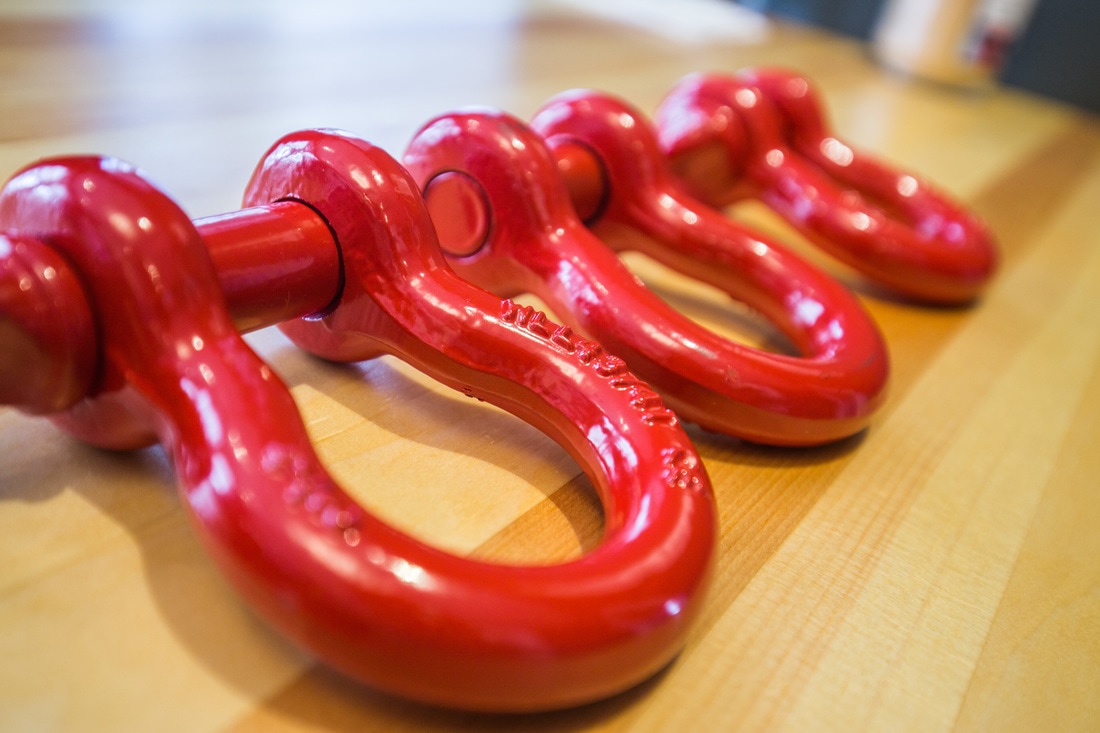
After scouring the internet I recognized a name from the ExpeditionOverland guys' front bumpers - Factor 55. A product by the name of "Hitchlink" caught my eye as the perfect solution to my needs for a rear recovery point. A block of aluminum weighing in at just under 2 pounds and rated to 9,500lbs , this thing is a beast. Their website depicts the ultimate failure point at 51,000 pounds... a point by which the trailer hitch and frame would have been yanked out from underneath the WK2. With a multitude of color options I rolled the dice for the dark grey to match Halley, and was quite pleased to find that it did. I bought some powder coated red 3/4" shackles to add a nice accent to the back of the Hitchlink, keeping with the grey/red theme of the entire vehicle. A few minutes on Amazon found me a locking hitch pin, since I've now got nearly $120 into my rear recovery point... not something I'm ready to have stolen off the back end of the Jeep.

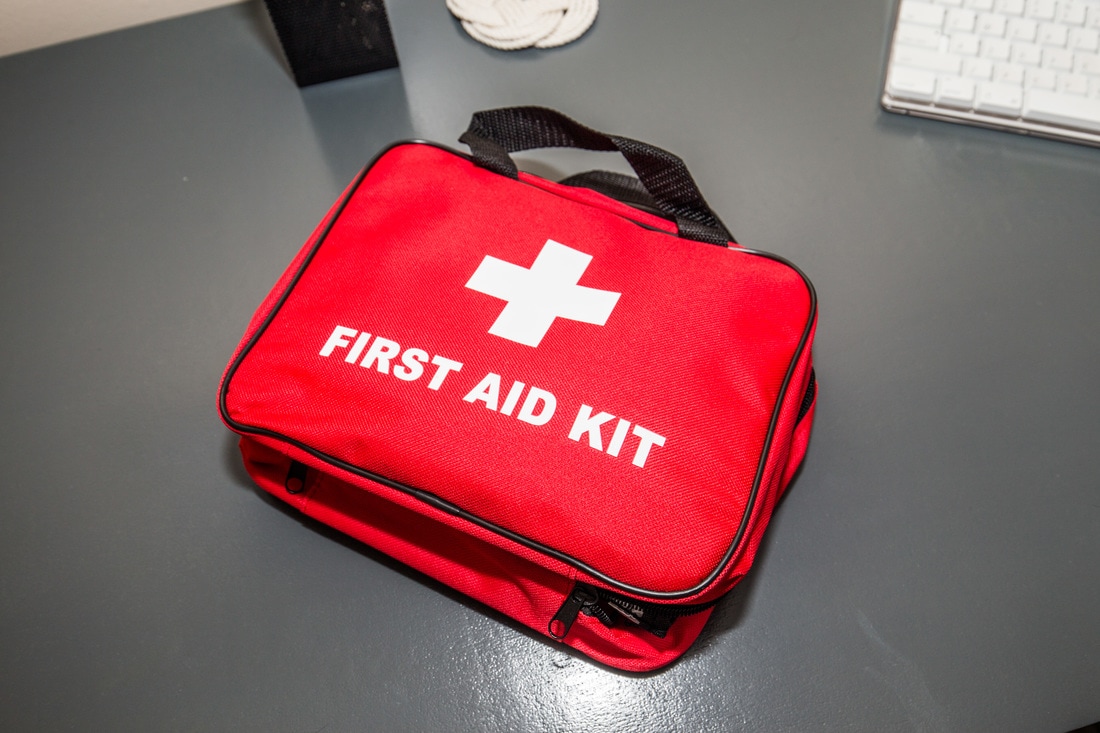
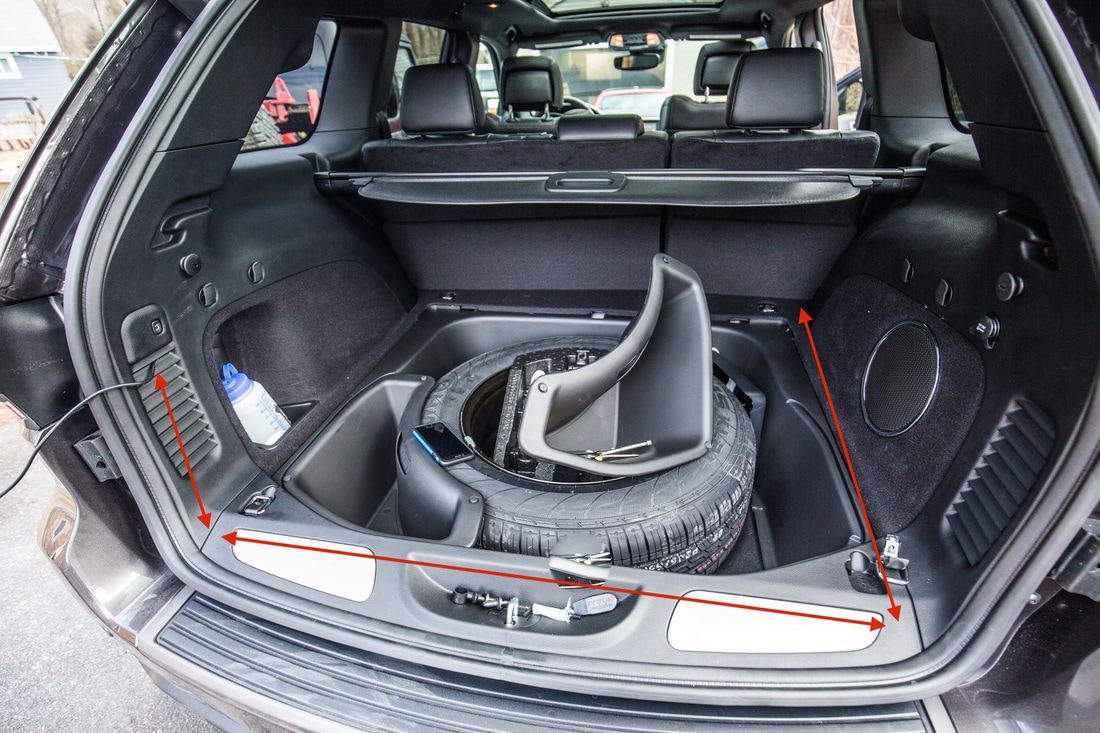
While on Amazon I also picked up a 125-piece first-aid kit for a whopping 20 bucks. Never a bad thing to have, and it even goes so far as to include a glow stick and space blanket. Hopefully never are needed, but for now they're stored in the nifty zipped up kit in the trunk's spare tire organizers. 

*Update 04/13 - Factor 55 has become a sponsor of the 2180miles Trailhawk build, so more products will be installed in the coming months! Huge thanks to them for providing products at discounted prices for me to use, photograph, and review.
0 Comments

Heavier Duty Spring Upgrade

2/25/2017

0 Comments

 
So the weather in New England has been crazy, so you'll have to forgive the exterior of the car being a mess. 

Last weekend Rob and I (check out Rob's tear-drop trailer build) drove out to Central MA to meet a guy from Craigslist who was buying Rob's Audi A3. I thought it was a great opportunity to check out the GC's long distance highway handling, as I'd yet to really take it that far outside the city since purchasing. Needless to say, it drove beautifully. While we alongside each other on the way out, he made a comment to me that the 2' antenna was leaning backwards, which surprised me; I really would have thought that an antenna that small would have enough drag to bend the spring mount, but alas it did. I ordered an HD stud mount while the Craigslist transaction took place, and finally had the chance to replace it.

Minor change, but it now stays perfectly vertical while driving, which is what the OCD in me strives for.

Last photo is one I took on I-95 last Thursday during the gigantic snowstorm that went through the area. I was completely, completely alone on the highway, snow blowing sideways, and at times impossible to see, so I naturally pulled over to take a photograph. Then I realized it would make a great shot of the Jeep itself, so I backed up a few feet to snap that. Good news is that this thing did amazingly well in the snow.

​

Picture
Picture
0 Comments

CB Radio Installation

2/18/2017

14 Comments

 
So the next thing up on the mods list was a CB. Our club has a requirement for CB radios during group events and trail runs, and while I'm not entirely sure yet that the Grand will replace the TJ on those easier runs, it's still important for me to have it. I've been planning to take the amateur exam and eventually installing a 2m/440 system in the truck, but haven't gotten around to that yet. For now, a few miles of coms is all I need on a regular basis. For better or worse, there's not a ton of information on CB installs in the WK2 models. A handful of photos here and there of antenna mounts, and a bit of HAM installs, but I figured I'd go ahead and of a more detailed write-up for anyone else that may need it in the future. 

In order to maintain a clean look for the cabin, and to occupy as little floorspace as possible, I chose the Cobra 75WX unit. The system is pretty much contained in the mic itself, with scan and weather functions, and has a separate box that converts the PL-259 coax to the mic cable, also adding an external speaker 1/8" jack (the 75WX is known for a weak speaker, since it's contained in the microphone itself... for now, it'll be fine, but I'll eventually put a speaker under one of the seats for a little more oomph). I also chose a 2' antenna with the approximate knowledge that when mounted on a spring by the bracket, I would get the top of the antenna about 8" over the roofline. While this isn't fantastic for any antenna, it will give me adequate reception and will still maintain a clean OEM+ look (it'll also be able to fit in the lower bay of my garage if ever the need arose, and I can easily swap in a taller antenna for trips with the club.

From the images I found on google, it seems most people rivet or velcro a mic clip into the center console or on either side of the 8.4" screen, but I wanted something that was a little more easily accessible and didn't require drilling a hole in the dash or the tacky look of an adhesive. I started searching for a cell phone type mount specific to the Grand Cherokee, and discovered the ProClip Console Mount which was designed to mate up to the center console by the cup holders. They provide a small tool to pop up the console and get the lip of the clip underneath for secure mounting. It took all of 2 minutes to get this thing hooked up, including drilling out and screwing in the mic clip that Cobra provided with the CB
Picture
Picture

Photos of other owners who have tailgate mounted antennas on the WK2 have shown them in two locations, 1 being drilled into the brake light assembly, and the other into the lower bumper below the brake light. In both instances the antenna is mounted into plastic, so I went ahead and ordered a NGP (no ground plane) antenna from Firestik. This is a special kind of antenna where the internal wiring is designed to work at locations that do not have metal ground planes, like motorhome fiberglass, on a motorcycle where the metal is minimal, and on boats. In this instance it worked perfectly for my plastic brake light.

I initially was hesitating to drill into the brake light itself but after removing the plastic pop rivets and taking the light off the Jeep, I realized that there was plenty of room to get a metal bracket on the back side of the mount in between the tail light's plastic. I cut up a small piece (1.5" x 1.5" , if that) of 18 gauge steel to provide a firm backing to the antenna bracket. Drilling it out to the same hole pattern as the bracket I was then able to use the self-tapping screws to get through the mount, plastic brake light, and metal on the other side. I painted the metal plate and put it front of my heat gun to speed up the drying. Putting this back onto the Jeep I was able to close the tail gate and check that there were no clearance issues between the two when it closed. Initially there was a little bit of rubbing (against the tail gate side plastic, not metal thankfully!) so I took the bracket to my angle grinder with a flapper disc and smoothed it down a bit to cut down on rubbing.
​
Picture
Picture
Picture

Next up in the process was figuring out how to get the coax cable back to the CB itself. I had decided from the beginning that the CB controller box would live under the battery compartment lid (the battery on the WK2 is under the passenger seat... makes 12v wiring a breeze), so the coax needed to end up there. I fed the wire through the vents in the back of the trunk, then used my interior trim tool kit to lightly bend the trim pieces and push the wiring underneath. I moved from the rear pillar to the trim piece at the very back of the trunk, then around to the passenger side. I had to unbolt the cargo tie down to lift the right side of that trim piece up, but then was able to feed the wire down along the spare tire compartment to behind the rear bench seats. Moving to the rear passenger door, I fed the coax under the door trim and then under the passenger seat bracket and into the battery compartment. It took a while to get all of this done, using patience as I was petrified of breaking a trim panel on the brand new truck, but I managed to use all 18' of the wire without any coils or major stuffing of any spare wire... all good things for signal! It's also nice that the only time the cable is exposed is the 2" between the B-pillar and the front passenger seat, and the location where it passes through the tailgate weather strip.

Once that was done, I went to check in on my buddy Rob who had been going to town with the battery compartment cover. Cobra includes a nice grommet and mount for the wire, so we decided that instead of mounting the control box on the top of the compartment cover, we'd mount it underneath. Due to where the battery lives there was a lot of room to the left side, where the control box fit perfectly. Simple crimp-on ends were easily attached to the (+) lead of the battery, and we grounded it out to the seat bracket for a good chassis ground. Drilling out the compartment cover to run the mic control cable under the seat, we then threw the grommet in there and called it good. The nice thing about this CB is that the microphone can detach from the control box so if I ever need to get it out of the way for whatever reason, it's simple to do so.

Here are the photos of the wiring (I labeled the route in red) and the under-seat bracket and wiring.
​
Picture
Picture

After this it was a matter of getting the antenna assembly onto the rear bracket, and tuning it. While Firestik tunes their CB antennas from the factory, I find it's always best to re-do the tuning on the vehicle itself to find out how the environment and install have affected its signal. The yellow band at the base of the antenna in some photos is there to denote that is is a NGP antenna and will not function normally on a standard CB antenna install. Once tightened down on the bracket and the tailgate operation was tested a few times, we took the Jeep out to the end of a state park where marshlands surround the parking lot for quite a distance in every direction. This area provides an uninterrupted surrounding for the antenna to be tuned in, not affected by power lines, buildings, or other structures that can cut down on the reception and SWR readings.

After toying around with the adjustable antenna screw for a while, Rob and I were quite pleased to have the CB measure in at around 1.2 - 1.5 SWR at channels 1, 20, and 40. In my many experiences installing CBs in my Wrangler (I've used 3, 4, and 5' antennas, so I've done a bit of tuning) and installing them in dozens of friend's rigs, this was the quickest and cleanest install to SWR readings I've ever come across. I was quite pleased. I took some photos of the Jeep while we were out there, and let Rob mess around with the air suspension, dropping it into it's lowest settings (which I hadn't yet done) and raising it up to Off-Road 2 mode, it's highest setting.

After returning back to his house, packing up my stuff and leaving, he sat in the cab of his Tacoma and we did a range-test between our radios as I drove away. I knew going into this that the 2' antenna would be a limiting factor on range, but I was happy to find that I could hear him clearly and he could receive me clearly up to around 2 miles away as the crow flies. I had measured out distances from his house online beforehand to know which landmarks marked which distances. So, a few hours and about $150 and I have a solid CB set-up in the Grand, with a range that will do just fine for what I need it for. 

Hopefully this will help someone out in the future if they are doing the same thing to their WK2. 

Big thanks to Rob for helping out. Here are the final photos of it installed.


​

Picture
Picture
14 Comments

Clear Bra Installation

1/27/2017

0 Comments

 
First up on the mods list (I guess removing the license plate bracket happened first) was to get the front end protective wrapped against road rocks and paint chips. I had been meaning to do this on the A4 when I purchased, but never got around to it. I had only had the GC home for 12 hours before I drove it a few miles and dropped it off at a local shop that has Lambos, Ferraris, and Porsches as his regular detail / wrap clients. In discussing my options with Pete, the owner of Unique Car Care, even before I took delivery of the Trailhawk, he laid out three options for protective packages that I could go with.

For $799 I chose the Xcel self-healing/UV safe/10 year warranty protective wrap for the full front bumper, grille, 1/3 hood, 1/3 front fenders, and mirrors. He even used a special "stealth black" to cover the hood decal to match the hood wrap line. In addition to this I had him do the b-pillars to protect the glossy black material from scratches, then the a-pillars and the roof line before the sun roof. My intention with the latter two was to protect the paint from scratches that I might encounter when on trails as the roofline lifts the low hanging branches up. I know a lot of you have access to wide open trails and beautiful mountain ranges, but in New England we have a ton of heavily wooded trails with overgrown vegetation that often lends pin striping to the paint jobs of our rigs.

Total cost with the pillars/roof add-ons and a detail job after the install - $1,049.00... Might seem steep, but with the road and trail miles I intend on putting on this, I think protecting it right off the bat was the only decision. Beneficial for me, he kept the car in his shop all week while I've been gone. 

Here are some photos he sent me during the install...
0 Comments

Meet halley - '17 Grand Cherokee Trailhawk

1/17/2017

0 Comments

 
I'm a decade long Jeep owner, having sold my Volvo 840 to buy my Wrangler TJ in high school, and building her since then. She's up on 35" Goodyear MTR/Ks, a 3" lift with Currie suspension components, 8,000 lb winch, Undercover Fabrication aluminum skids underneath, Rigid LEDs everywhere, strobe lights for on-road recovery stuff (good samaritan lights as I call them) and the rest of the typical works with electronics and radios. The members of the Massachusetts Jeep club I founded in 2011 (visit NorthShoreJeeps.com) affectionately call her Big Red. As our club has grown, my close group of Jeep friends began discussing an overland trip through northern New England. As I took on the planning of our adventure with my buddy Rob, I began realizing that the TJ wasn't going to be the best platform for me personally to do these kinds of trips in.

I began shopping for a new Jeep Wrangler Rubicon Unlimited, floating the idea of trading my daily driver in and keeping the TJ and the JKUR, each to serve different purposes. As my research continued and I spoke with JKUR owner friends, I realized that I'd much rather have something along the lines of an SUV that would be less of a one trick pony. I travel for work and therefore frequently have rental cars, so I began test driving the Grand Cherokees during my weeks away from home, which ultimately turned my search in that direction. Reading about the current (2016) and new models for 2017, I focused on the Overland and Trailhawk trims as ones I'd be interested in buying. Price was a factor, but I knew early on that I didn't want to heavily mod this truck, so buying a Limited trim and upgrading things wasn't really in the cards for me. The Overland is much more of a luxury oriented vehicle than the name might suggest, and the Trailhawk is the nitty gritty, but still very well equipped, model. 

After many months of waiting, debating, test driving, yada yada, I finally went ahead and purchased a 2017 Trailhawk in January of 2017. Fully loaded (minus Blu-Ray entertainment which I saw no need for), it was a unique package with the active safety package, luxury package - read: panoramic sunroof that I dreamed about, multiple skid plates underneath, 18" wheels wrapped in Kevlar lined Goodyear A/Ts, and the Quadra-Trac/air suspension package. Sticker was $49,500, and after a week of putting dealerships against each other, and after a bit of negotiating I got it from a dealer in New Hampshire (90 minutes from my house in Boston), for $42,799. I am quite happy with the price, and opted to add the 7-year bumper to bumper Mopar warranty for $1,300 for a piece of mind. There's a high likelihood I keep it that long, and I can get money back from FCA if I sell the vehicle first.

Here's a photo of her from shortly after I took delivery.

​
Picture
0 Comments
Forward>>

ADVENTURES

Trans-Canada Overland Expedition
The Long Trail
Appalachian Trail
Bicycling Across America

Overland Build

Meet The Jeep
Backcountry Gear
​Modifications & Installations

Everything Else

Read The Blog
Photography
Guest Book
Contact

Picture
© COPYRIGHT 2019
​All Rights Reserved