Diamond 1/4 Wave Antenna Installation:
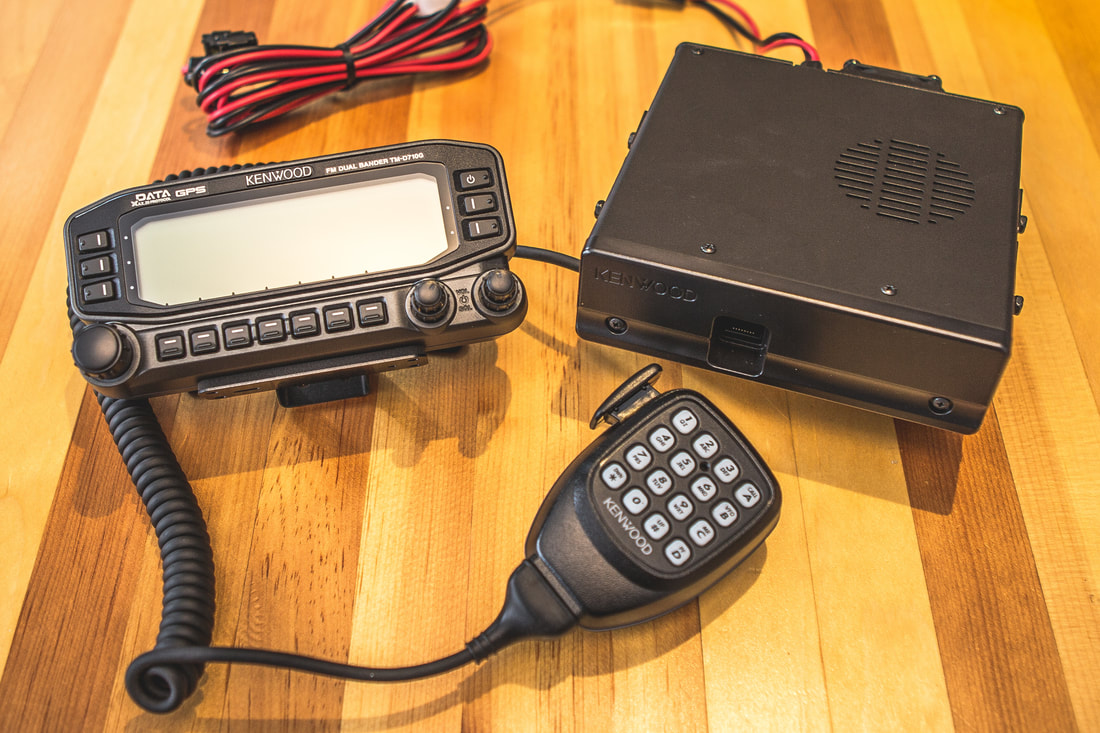
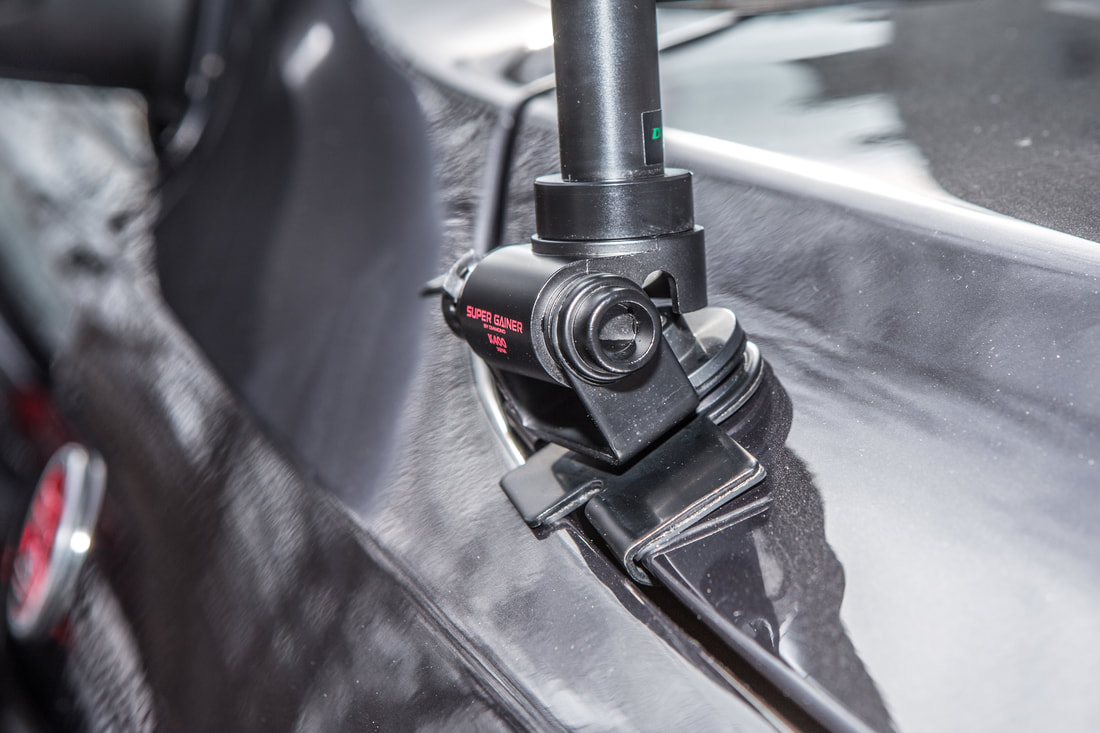
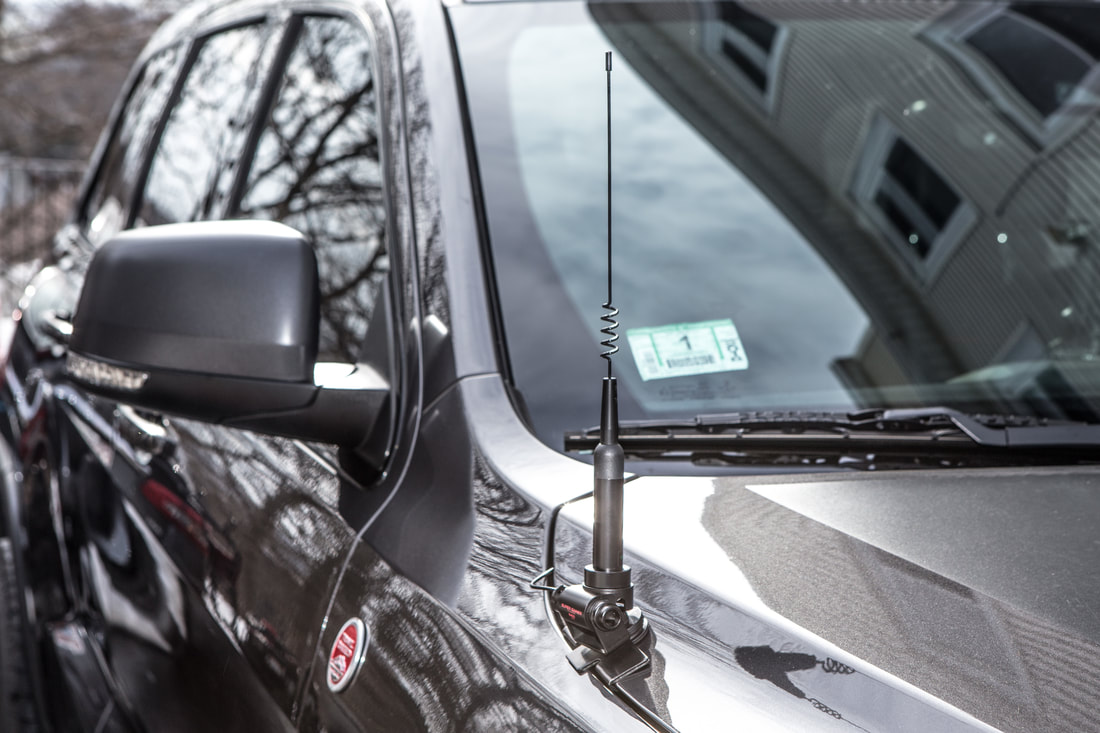
This is the Kenwood D-710G dual-bander with GPS/APRS and a lot of other features. I chose the Diamond NR72B antenna for aesthetics and function, it's 14" tall and 1/4 wave. This is my first installed mobile rig so it may not be the world's best gear matching (mainly talking about the antenna) but the height was appealing and the range should still be suitable. Diamond shows 2.15dB gain on both 2m and 70cm. The mount is the ever-popular Diamond K400NMO with multi-axis tilting, and this will get mounted on the hood as there aren't many other places on the WK2 where there's enough folded metal to allow for a mount.
I finally got a break from Boston's single digit/sub-zero temps and began the installation of my Diamond K400 mount and NR72B antenna in the WK2. Full disclosure, the photos were taken on two different days: first when the Jeep was a mess from the blizzard that had just passed, and the other after a few hours of interior and exterior detailing. Please forgive the dirty ones.
I chose the K400 mount for a hood installation as I'm not quite ready to drill into the roof, and I'm also hoping to get a RTT up there for this year, which would probably negate the ability to have a roof mounted antenna anyway. The hood may not be the single most optimal position for the antenna as far as gain and interference go, but it's clean and will be functional nonetheless. The K400 mount was recommended by a friend and allows for an unobtrusive installation wherever there's a crease in the body panels of a vehicle. It has two adjustable axis which allow to get the antenna vertical regardless of the mounting plane you put it on.
The mount comes with the necessary tools for installation, and is padded on the bottom to protect your vehicle's paint. With four simple allen key'd set-screws underneath that press a stainless steel metal bar against the underside of the mounting location, the bracket becomes secured in place. It took me a few test fittings to get the antenna perfectly vertical from all planes, but once it was aligned correctly I tightened down the adjustable axis allen heads and mounted the Diamond NR72B antenna. Standing only 14" tall, it's sleek on the hood and isn't overly obnoxious for my field of view while driving. This will be perfect for everyday use, and I'll test it on overland trips with the group... It has crossed my mind to maybe get a full 36" antenna as well for long haul trips, much in the same way I have a 3' and 5' CB on my Wrangler for when we're on trips that might separate us more. (There's no mobile dual-band radio in the TJ, just handheld)
 |  |
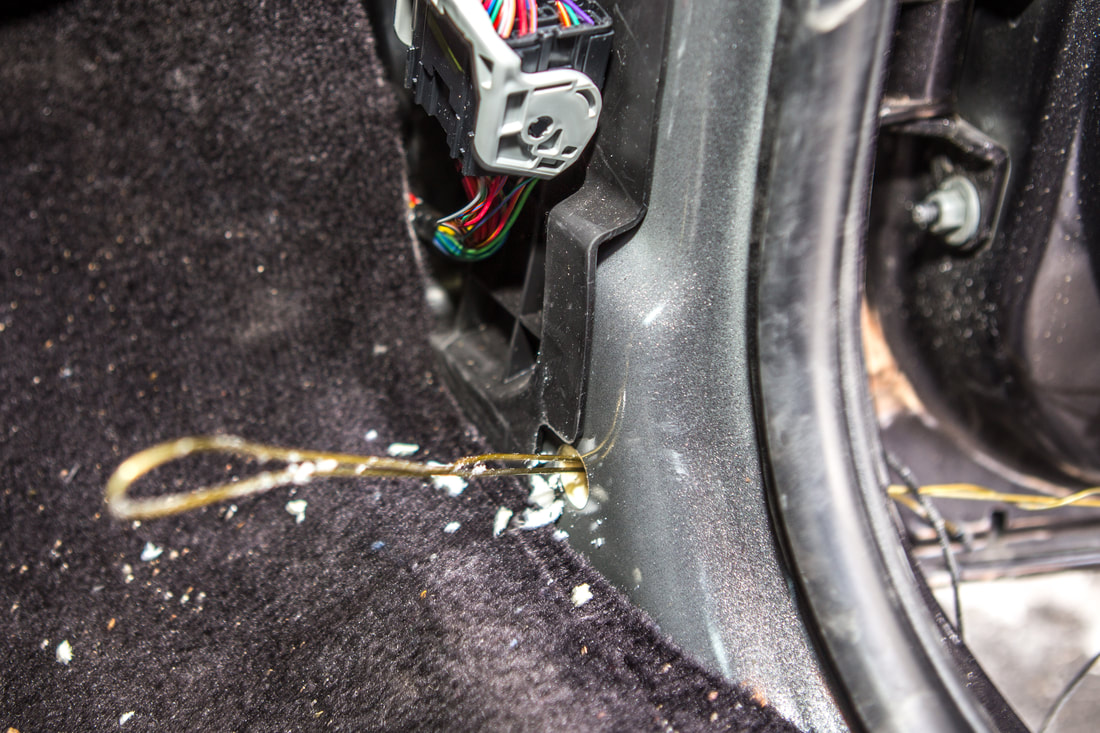
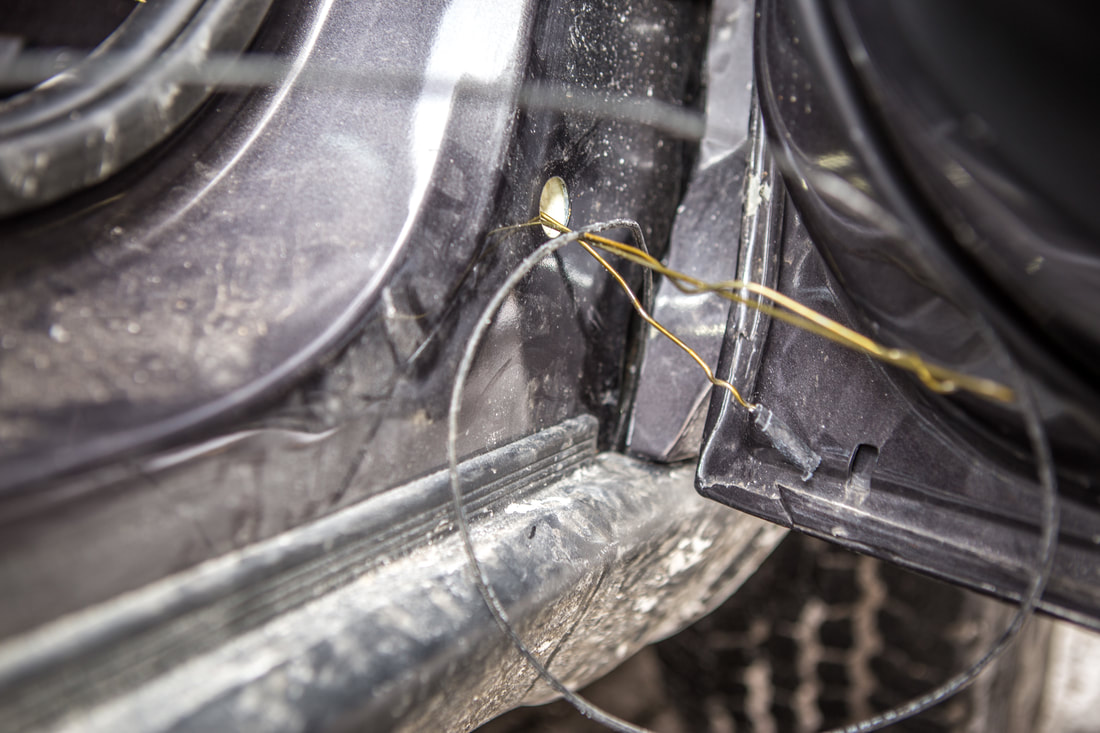
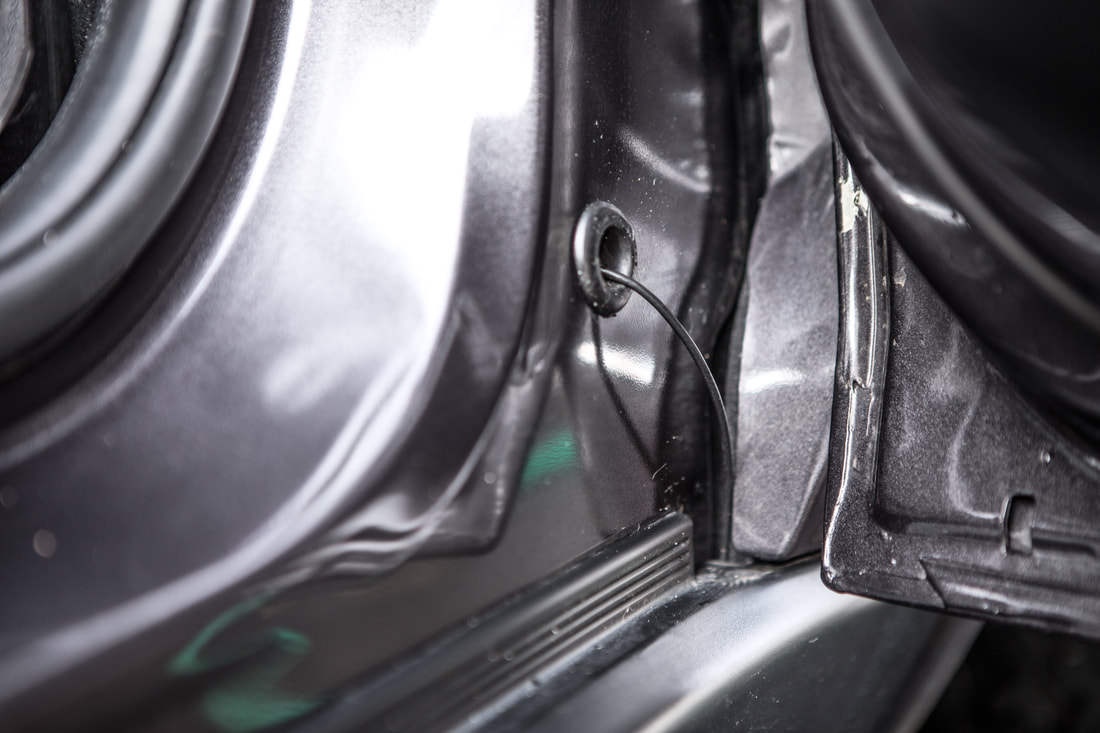
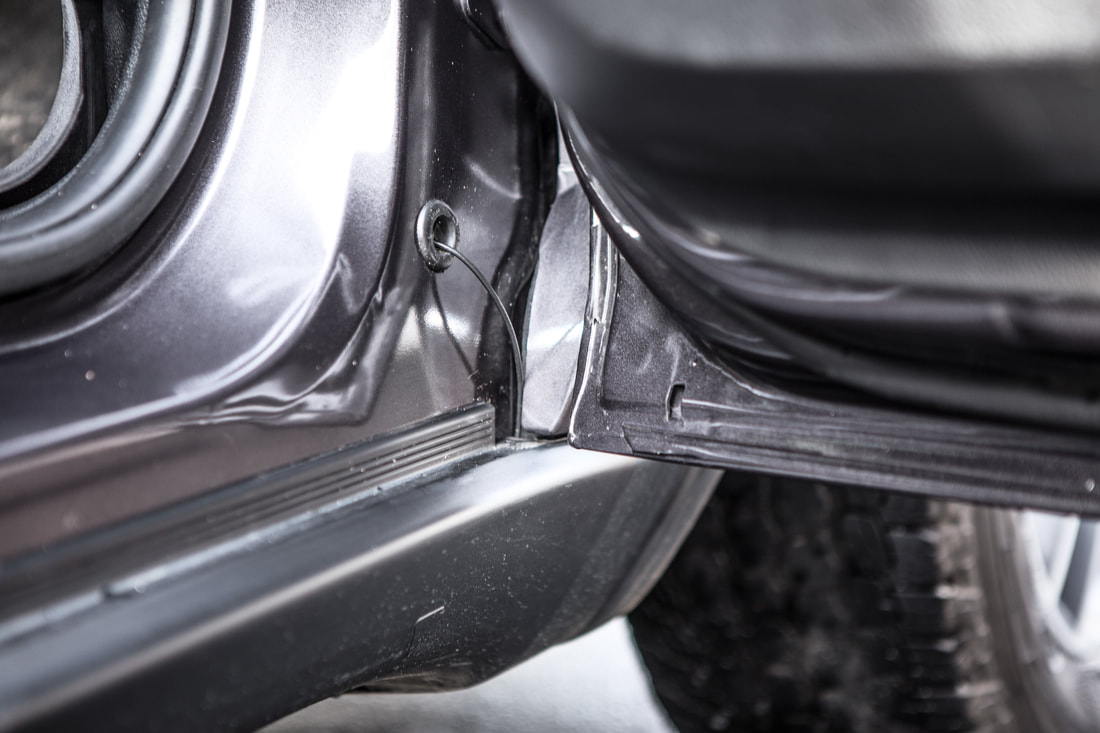
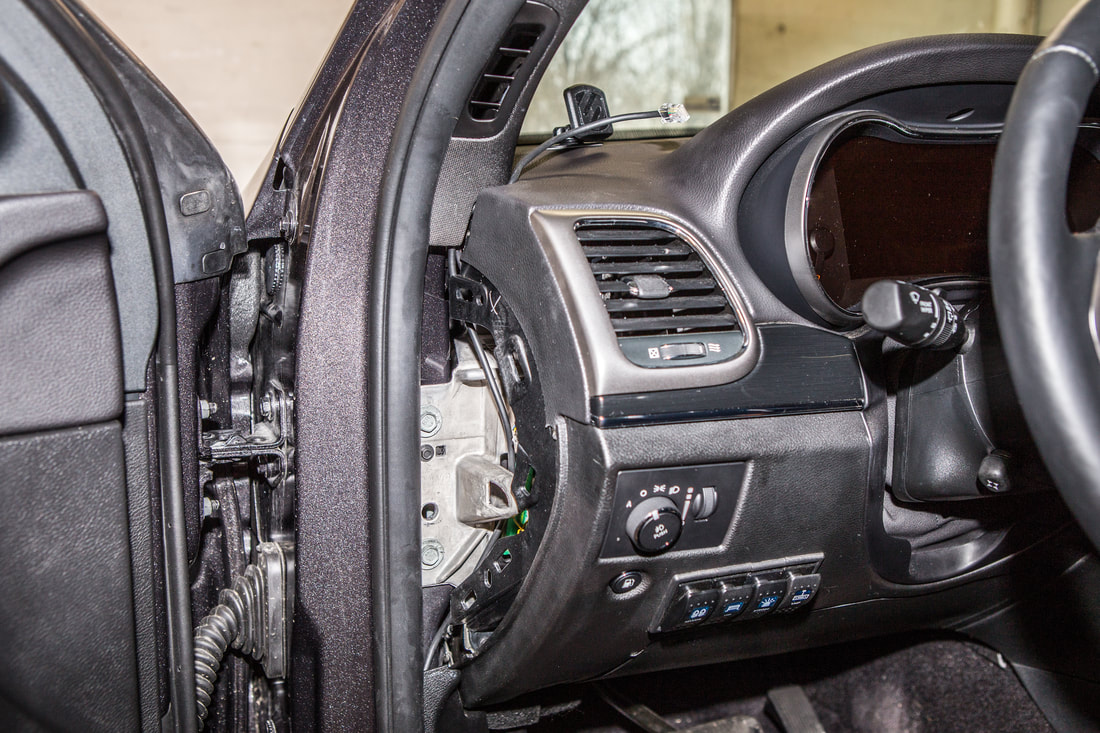
Once the antenna was mounted, I moved on to routing the supplied 13-foot coax line that came with the K400 bracket. Being spoiled by the Warn Zeon Platinum's Wi-Fi remote, I've never actually had to run cable through the firewall of the Trailhawk, so this was going to be a new adventure for me. I did some Google research and read about grommets above the gas and brake pedals, but wasn't able to locate them on this specific model. My hope was for passenger side installation, so I continued digging until I found an article referencing a grommet on the A-Pillar, passenger side of the vehicle. I pulled the necessary internal trim pieces, door sill and the kick plate on the right side of the foot-well, and located the grommet the forum was talking about. I began snaking the tiny coax through the engine bay, down behind the passenger front strut tower, through the wheel well trim, and down into the rocker panel trim piece. I then fed it up a tiny gap in the rocker trim up by the fender flare, and pulled the remaining slack through. This was no easy process, and I was constantly wishing for warmer weather, and to not be lying on the snow covered ground on my back running the cable underneath.
Once the cable was ready, I popped the A-Pillar grommet out of its position and drilled a small hole in it, solely large enough for the cable to get through, which required some good pressure on the tiny SMA adapter at the end to get it through the hole. Once the cable was passed through the grommet I used a coat hanger to puncture a small hole in the vehicle's insulation that was stuffed in the A-Pillar, then taped the SMA adapter to the coat hanger and pulled it back through into the cabin. I ran the coax underneath the door sill trim piece and then under the passenger seat mounting bracket, arriving at the same spot at the CB coax, directly above the battery compartment.

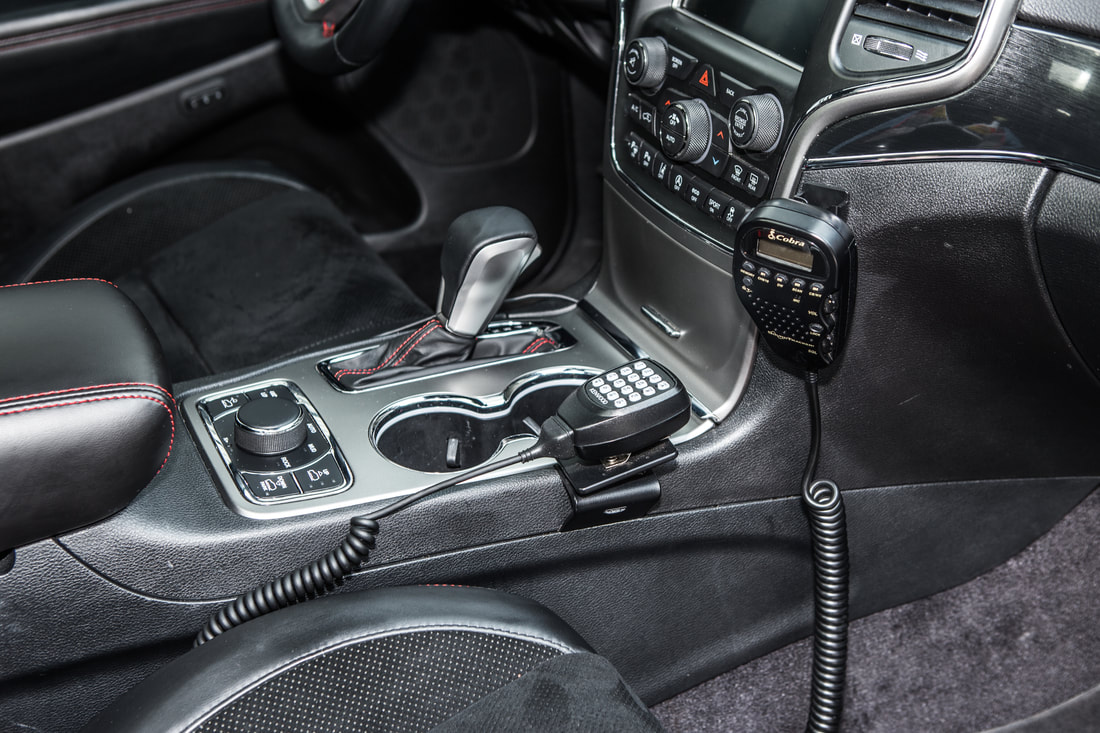
I put all the trim pieces back together, ensuring the coax was not pinched or stressed as the hood opened and closed, and set to work with moving around the comms system in the cabin. While I don't love the idea of having two transceiver mics in such a small amount of space, I'll be retaining the CB for when we do our local Jeep club runs, and the dual-band for overland trips with my more tight-knit group. I used 3M's "super heavy duty could probably hold up an elephant in an earthquake" double stick tape, and mounted a black plastic mic holder to the dashboard not far from the original mounting position. the Kenwood mic then fit into the original mic mount I made for the CB almost a year ago. It looks okay. It's fine. Dani said there's no loss to the passenger legroom, so we'll run it like this for now until I come up with something better.
Kenwood D-710G Installation
When we left off, I had just finished installing the antenna, coax cable, and transceiver mic into the Trailhawk. Next up on the project to-do list was the installation of the Kenwood D-710G transceiver itself, as well as the head unit. After seeing a plethora of installs in WK2 Grand Cherokees with the head unit stored inside the center console cubby (i.e. where the USB charger, 12v plug, and aux input are), I decided I wanted mine to not be as hidden, and also to not be blocking anything useful like the things I listed above.
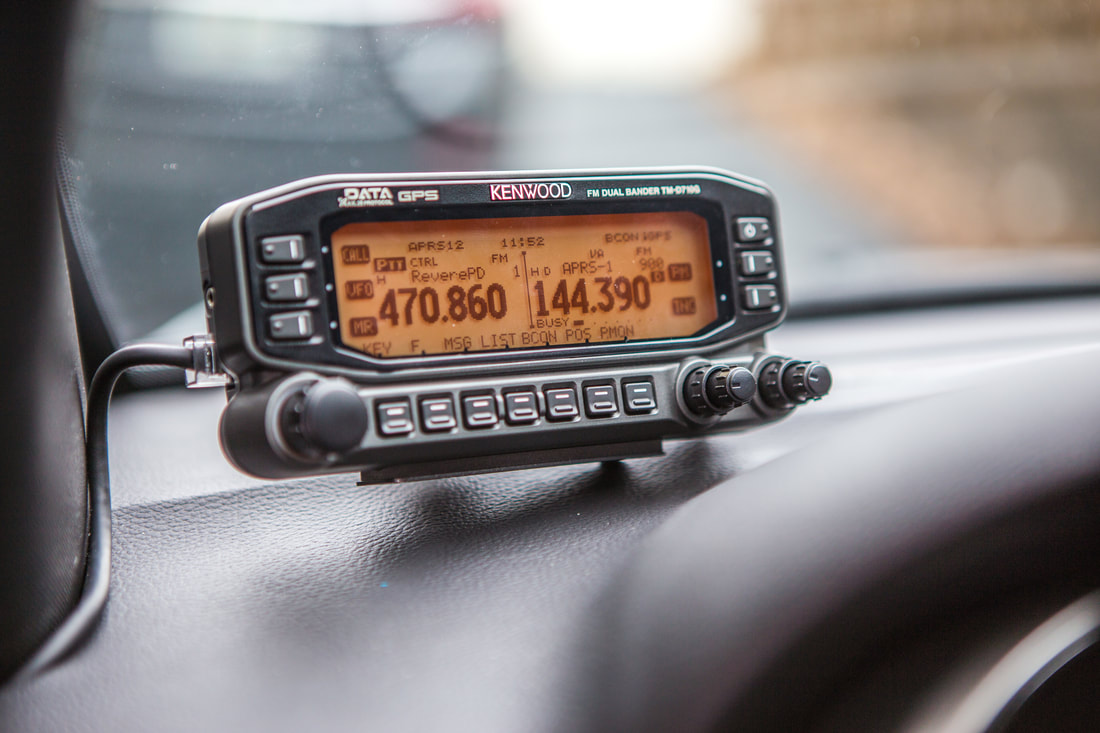
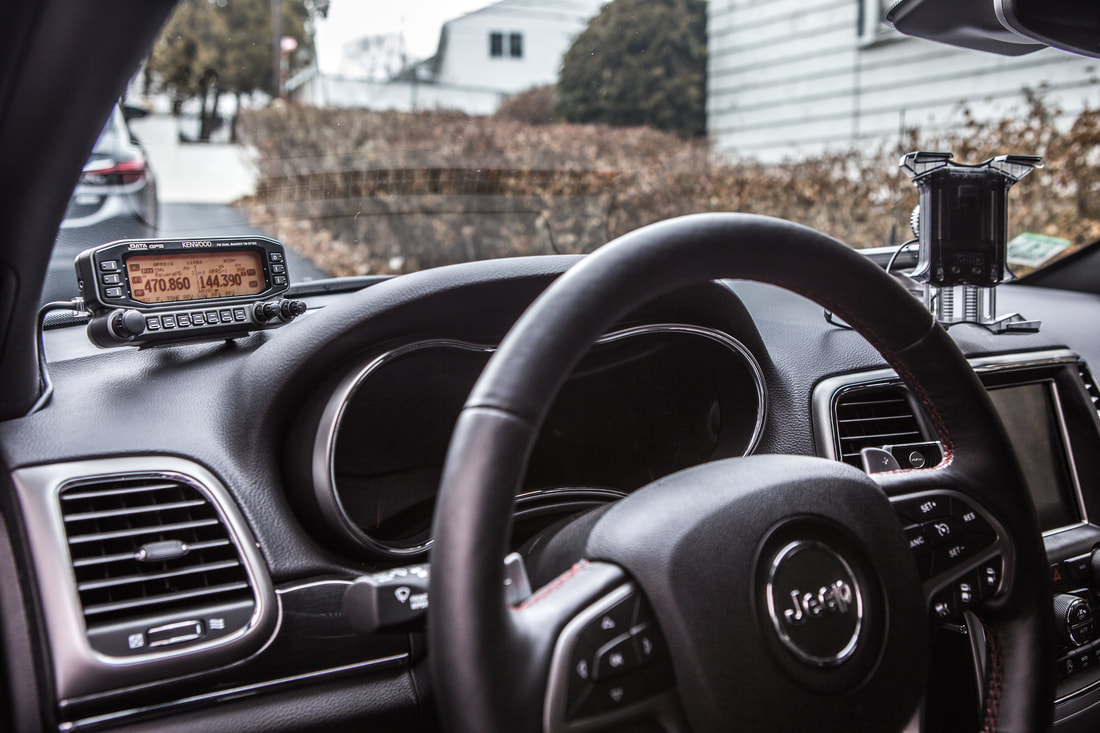
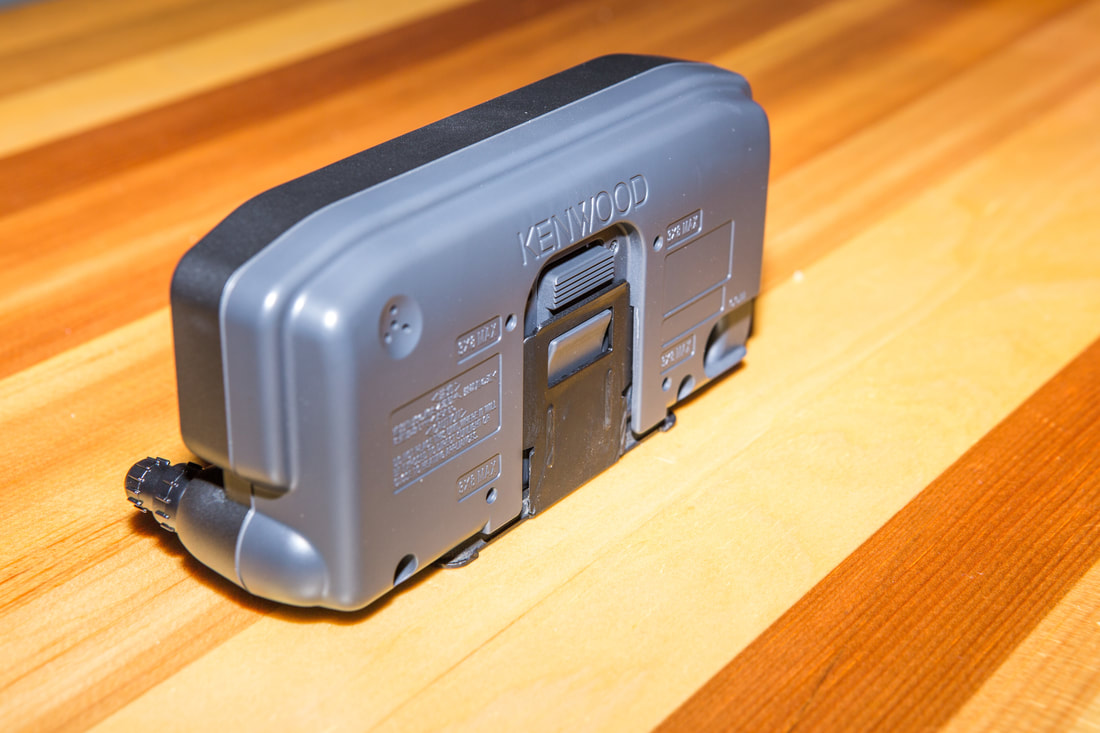
After some searching on Amazon I discovered the MagicMount universal phone mount. It's small and magnetic, with an exceptionally strong pull for whatever is mounted to it. I decided that I'd figure out a way to mount the 710 remote head to the Magic Mount and place it on the left side of the dashboard by the driver's A-pillar in the cabin. I used the supplied Kenwood remote mount, took my Dremel cut-off wheel to the two mounting/screw tabs, and made it flush across the back for the magnet portion of the mount to adhere to. I re-painted it and attached it to the Kenwood before moving on to installing the MagicMount. Sticking the mount to the dash after cleaning the area with an alcohol, I applied pressure for 60 seconds or so before letting it “cure” overnight. Once that had settled I magnetically attached the D-710G head unit and it's been holding without issue ever since.
After some searching on Amazon I discovered the MagicMount universal phone mount. It's small and magnetic, with an exceptionally strong pull for whatever is mounted to it. I decided that I'd figure out a way to mount the 710 remote head to the Magic Mount and place it on the left side of the dashboard by the driver's A-pillar in the cabin. I used the supplied Kenwood remote mount, took my Dremel cut-off wheel to the two mounting/screw tabs, and made it flush across the back for the magnet portion of the mount to adhere to. I re-painted it and attached it to the Kenwood before moving on to installing the MagicMount. Sticking the mount to the dash after cleaning the area with an alcohol, I applied pressure for 60 seconds or so before letting it “cure” overnight. Once that had settled I magnetically attached the D-710G head unit and it's been holding without issue ever since.
 |  |

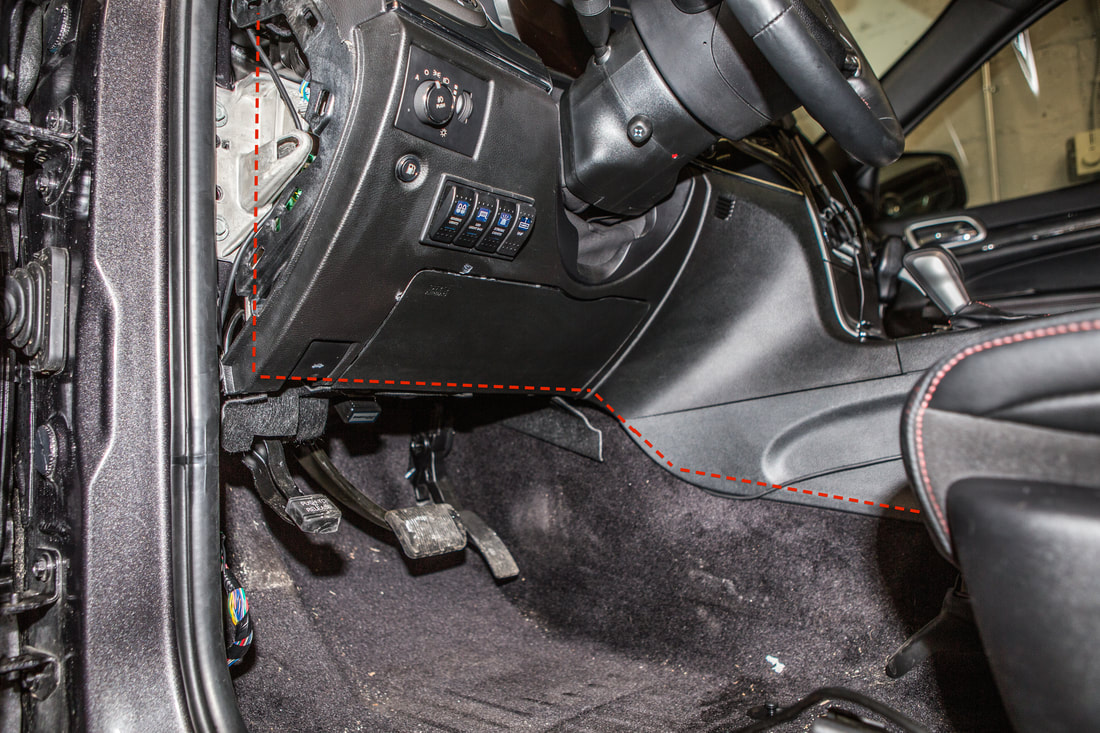
With the remote head in place I then had to connect it to the transceiver with the supplied Ethernet/Cat-6 cable. My initial hope had been to run it under the door sill trim on the driver's side, but the presence of the 6-strand cable for the auxiliary lighting switches made it too difficult to run both wires back under the front seats neatly. Slightly disappointed, I began brainstorming other solutions.
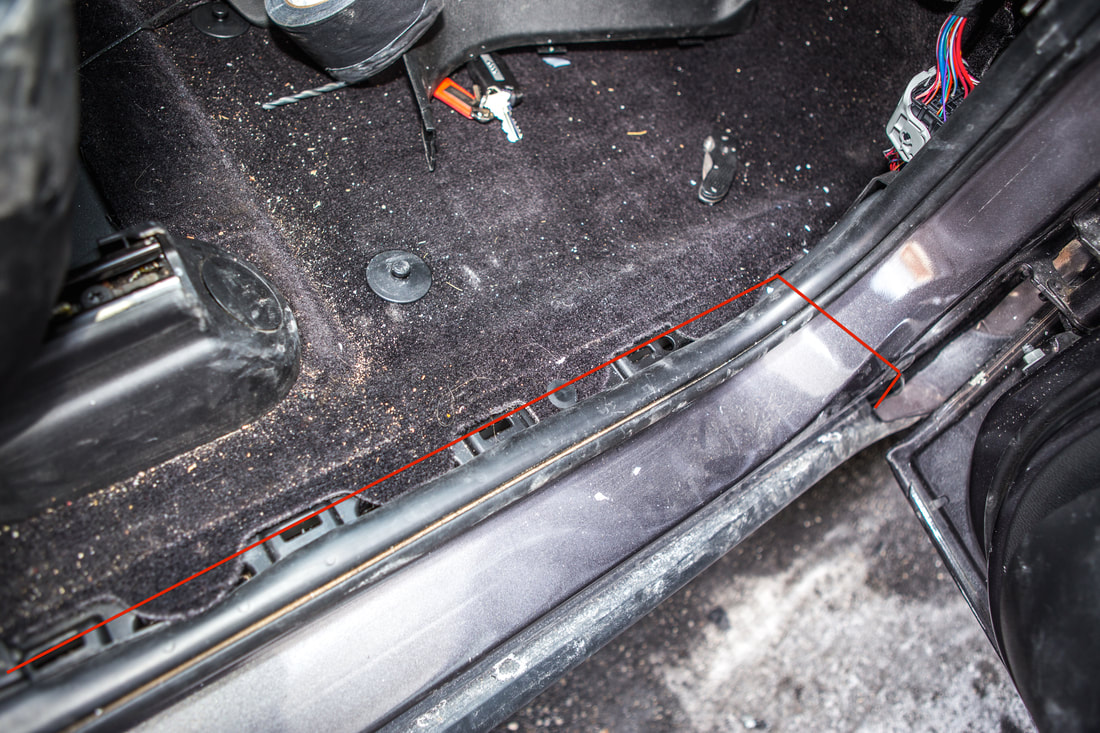
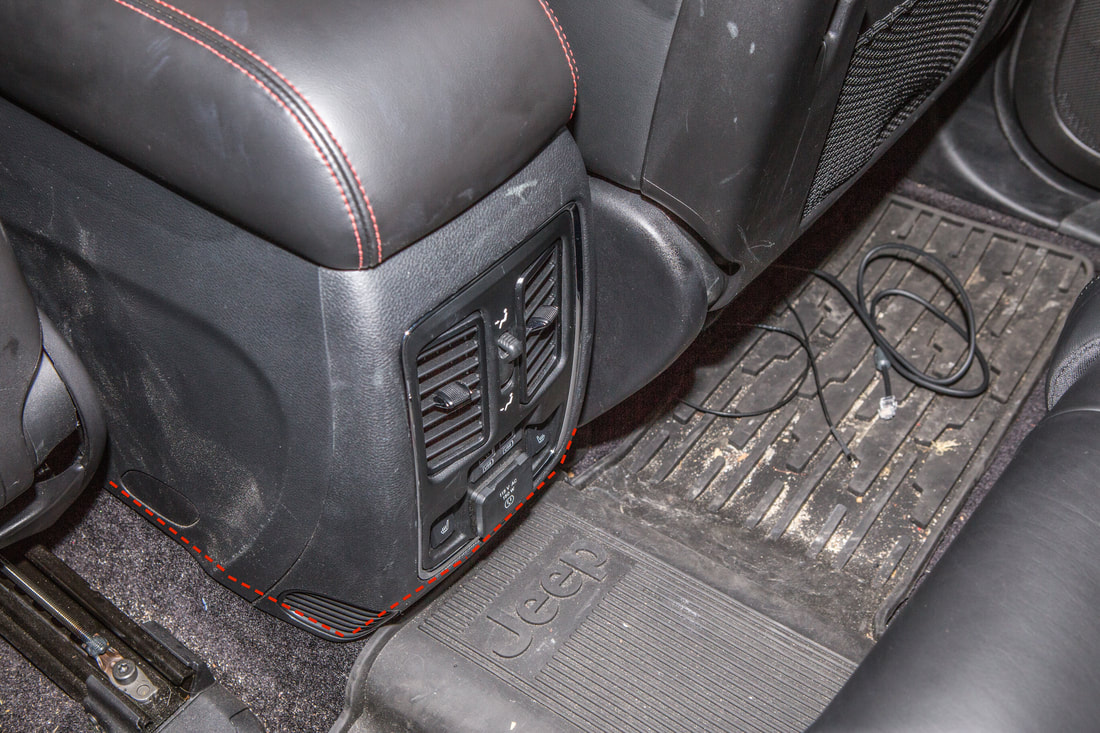
Always hoping for a clean, factory-looking install I removed the A-pillar panel from the dash, the kick trim from the driver's foot-well, and the carpet trim above the brake and gas pedals. I ran the Cat-6 from the top of the A-pillar down to just below the dash trim, then over the foot-well region, following along the tranny tunnel, pushing it ever so slightly up under the trim until I had worked my way back past the driver's seat to the backseat of the Jeep, following along the console in the back and returning it to underneath the passenger seat where the transceiver will live for now. To better illustrate this cable path for anyone interested in following it, I've used a dotted red line on the images below to give you a better idea.
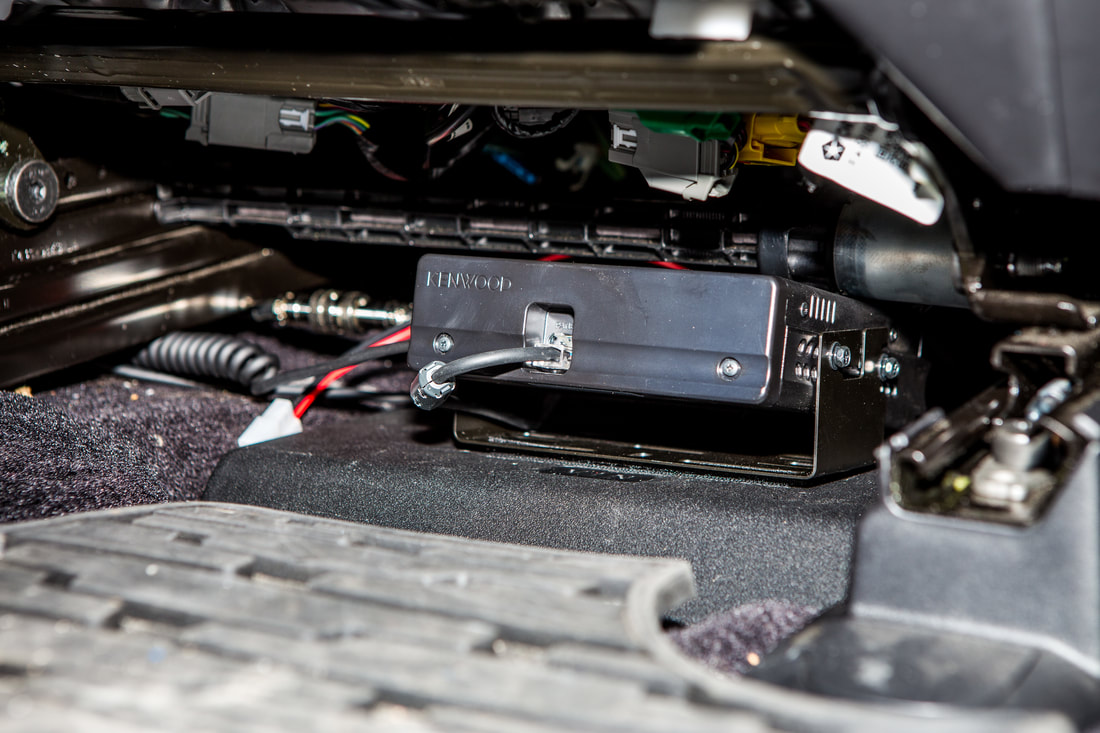
To facilitate the easy removal of the Kenwood base unit if ever need be, I used industrial strength Velcro (or hook-and-loop depending on where you're from in the world) on the top of the battery compartment tray. The passenger seat has a ton of flexibility with positioning and only comes into contact with the transceiver if it's all the way down in position… luckily my co-pilot isn't the tallest girl around so there shouldn't be any issues squishing it.
The wiring situation isn't immaculate right now so I do not have any images of the battery compartment, but I will be cleaning that up soon and ideally circumventing the potential for even messier wiring by moving to a dual-battery set-up if a few more cards fall into place over the next few months. I used some YouTube videos for help with setting up the basic functions of the radio, and after some trial and error got the APRS set up appropriately. Within an hour I was able to see the GPS location of the Jeep on www.aprs.fi - a great trick that will be very handy in areas with no cell service throughout the continent.
Final install photos of the radio in the main cabin... it's well out of the way of my line of sight while driving, and despite most of the functions being able to be recalled with the mic head, I can easily access the buttons on the head unit if need be.